
[ad_1]

For any business that relies heavily on online sales and transactions, the growing number of cyberattacks targeting e-commerce websites is a growing concern.
E-commerce websites are vulnerable to attacks such as distributed denial of service (DDoS) and Brute force attacks, which can result in the loss of valuable business traffic from legitimate customers or the compromise of your users’ sensitive information.
Fortunately, you can get another layer of remote protection whenever your servers use a Generic Routing Encapsulation (GRE) tunnel. Such a tunnel makes it possible to establish a private connection between your servers or your network and a cleaning center.
This allows the protection provider to scan all your incoming traffic for malicious activity and block any potential threats before they reach your servers.
After your incoming traffic is scanned, all secure traffic is passed to your network or servers for processing through the GRE tunnel. The response from your server is sent through the GRE tunnel to the cleanup center and to the client.
Together with Google Core, a global security provider, we’ll explain what GRE tunnels are and how they help keep your data secure. It will then walk you through how to configure your routers and hosts in your data center to establish a secure and seamless connection to Gcore’s Cleansing Center through a GRE tunnel.
Specifically, the article will explain how to configure a GRE tunnel interface to communicate over the Internet on a Cisco router or Linux host.
What is a GRE tunnel and how does it work?
A Generic Routing Encapsulation (GRE) tunnel is a network connection that uses the GRE protocol to encapsulate a variety of network layer protocols inside virtual point-to-point links over an Internet Protocol (IP) network. It allows remote sites to be connected to a single network as if they were both directly connected to each other or to the same physical network infrastructure.
GRE is often used to extend a private network over the public Internet, allowing remote users to securely access private network resources.
It may seem that GRE tunnels and VPNs are the same. However, GRE tunnels can carry or forward multicast traffic, which is essential for actions such as routing protocol advertising and for video conferencing applications, while a VPN can only carry unicast traffic.
Additionally, traffic over GRE tunnels is not encrypted by default, but VPNs provide different encryption methods through the IPsec protocol suite, and their traffic can be end-to-end encrypted.
However, the traffic transmitted on most sites uses encryption standards such as TLS/SSL for all communication.
You can think of a GRE tunnel as a “tunnel” or “subway” that connects two different networks (for example, your company’s private network and Gcore’s cleaning center network). Just as a subway tunnel allows people to travel between different stations, a GRE tunnel allows data to travel between different networks.
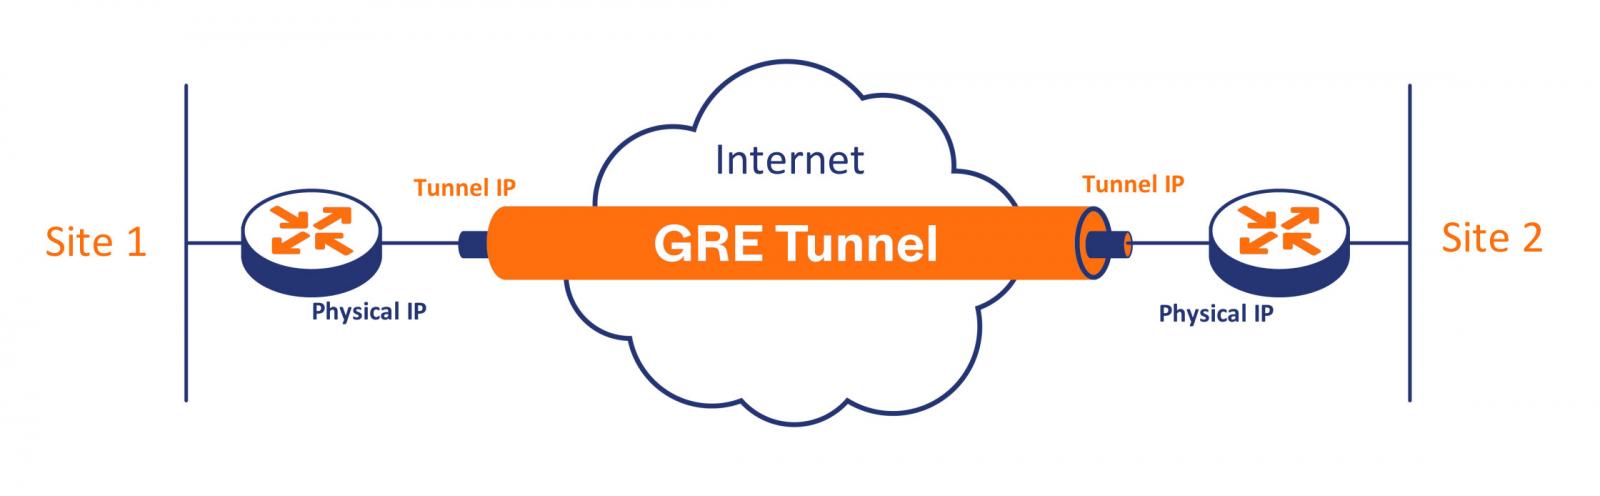
Source: G-Core
The “train” in this analogy is a data packet sent through the tunnel. These packets are “encapsulated” or surrounded by a GRE header, which tells the network where the packets are coming from and where they are going, much like a subway train has a destination in front and behind. the back.
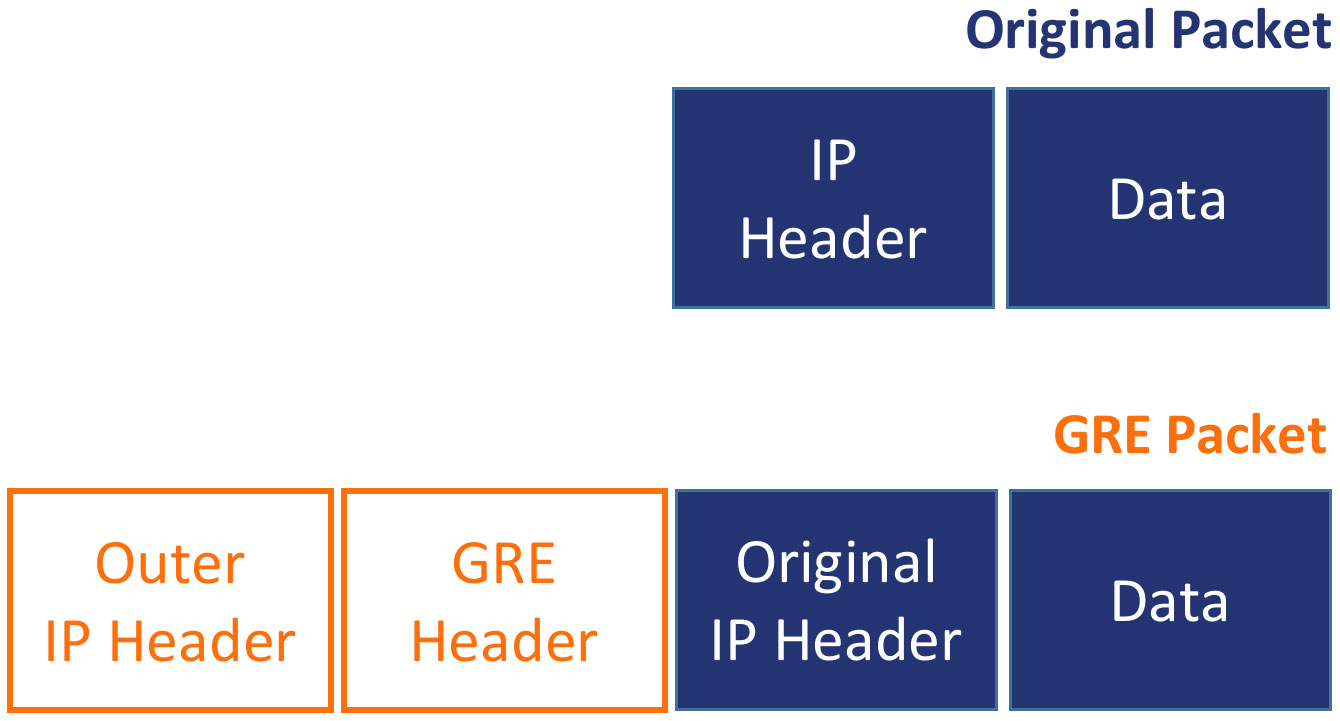
Source: G-Core
Once the packets reach the “destination station”, the GRE header is removed and the original packets are sent to their intended destination. In this way, data can travel securely and privately over the public Internet as if it were on a private network.
Configuring Your Network Hosts for GRE Tunneling
Now that you understand what a GRE tunnel is, the next sections will show you how to configure tunnel interfaces on a Cisco router and on a Linux server within your data center. You will also be shown how to configure private IP addresses on these tunnel interfaces and test the connections.
Configuring a GRE Tunnel on a Cisco Router
First, you will configure your Cisco router to connect to the Gcore Cleansing Center through a GRE tunnel over the public internet, as shown in the diagram below:
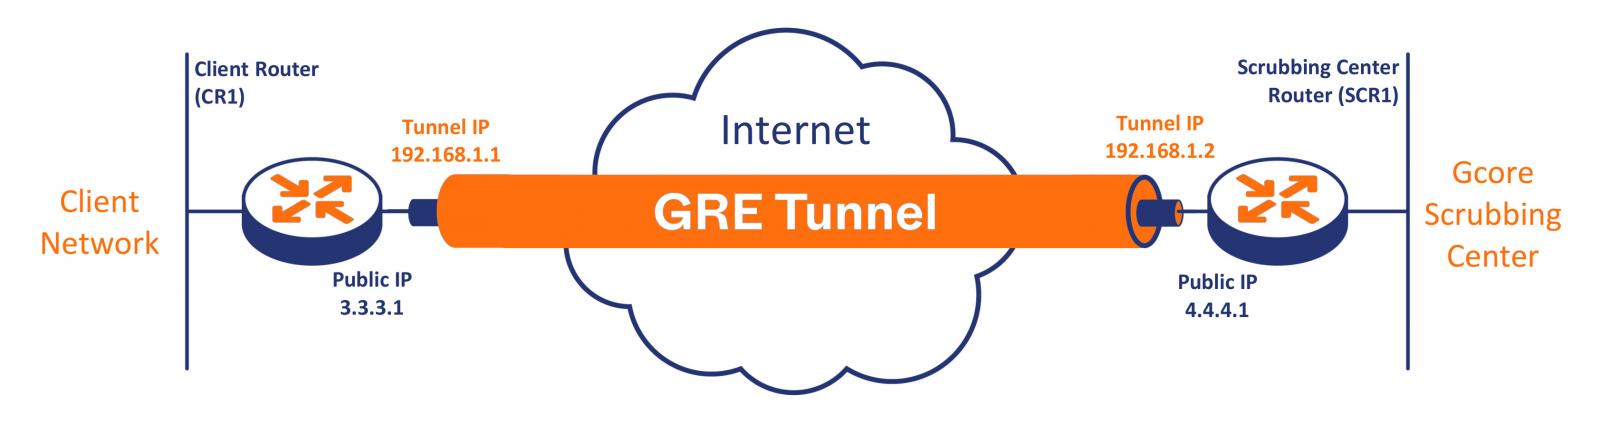
Source: G-Core
In the diagram above, both routers have physical public IP addresses that they can use to directly connect and interact on the Internet through their respective ISPs. There is also a private network behind the routers at both ends and private IP addresses for the tunnel interfaces (192.168.1.1 for the customer router and 192.168.1.2 for the cleaning center router).
Through a public connection over the Internet, a private connection is established using the private IP addresses on the tunnel interface, as if both tunnel interfaces on each device were physically connected directly to the same network.
First, log into your router, either via console cable directly or via SSH if you have it configured, and enter global configuration mode with the following command:
bash
CR1# configure terminal
You can now create a virtual tunnel interface. The tunnel interface can be any number you want. The following example uses 77 and also puts you in interface configuration mode:
CR1(config)# interface tunnel 77Then configure the tunnel interface you just created with the private IP address of router CR1:
CR1(config if)# ip address 192.168.1.1 255.255.255.0Define the tunnel source or the interface through which the tunnel establishes a connection from your router. In the following example, the source is the client router’s public IP address, 3.3.3.1:
CR1(config if)# tunnel source 3.3.3.1You also need to configure the tunnel destination – in this case, the public IP address of the cleaning center router, through which you connect to the private tunnel interface of this router:
CR1(config if)# tunnel destination 4.4.4.1As you know, GRE adds additional headers with information to the original packets. This changes the packet size to 24 bytes from the standard [MTU limit](https://en.wikipedia.org/wiki/Maximum\_transmission\_unit) of 1500 bytes, which may cause packet loss. You can solve this problem by reducing the MTU by 24 bytes to 1476, so that the MTU plus additional headers does not exceed 1500:
CR1(config if)# ip mtu 1476Accordingly, you must modify the [MSS](https://en.wikipedia.org/wiki/Maximum_segment_size) at 40 bytes less than MTU at 1436:
CR1(config if)# ip tcp adjust-mss 1436Now exit into privileged EXEC mode and check your router’s IP configuration:
CR1(config if)# end
CR1# show IP interfaces brief
You should have output similar to the following, showing the tunnel interface with the IP address you configured:
CR1# show IP interface briefInterface IP-Address OK? Method Status Protocol
GigabitEthernet0/0 3.3.3.1 YES manual up up
GigabitEthernet0/1 unassigned YES NVRAM down down
GigabitEthernet0/2 unassigned YES NVRAM administratively down down
GigabitEthernet0/3 unassigned YES NVRAM administratively down down
Tunnel77 192.168.1.1 YES manual up up
Test the connection to the remote router, SCR1, using the private tunnel IP address 192.168.1.2:
CR1# ping 192.168.1.2Your output should look like the image below, confirming a successful connection:
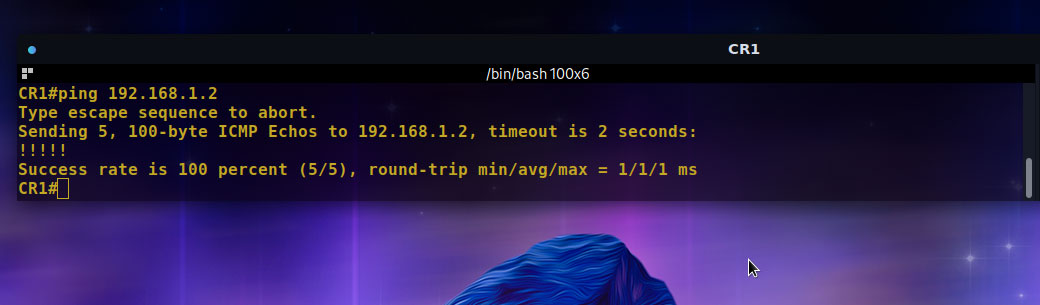
Source: G-Core
Finally, save your running configuration:
CR1# copy running-config startup-configYou have successfully configured your router to establish a connection through a GRE tunnel.
Setting up a GRE tunnel on a Linux server
This section explains how to configure the tunnel interface and establish a connection through the GRE tunnel to the remote server. This particular setup uses the Ubuntu 20 LTS operating system.
Below is a diagram illustrating the setup for the different aspects of this setup:
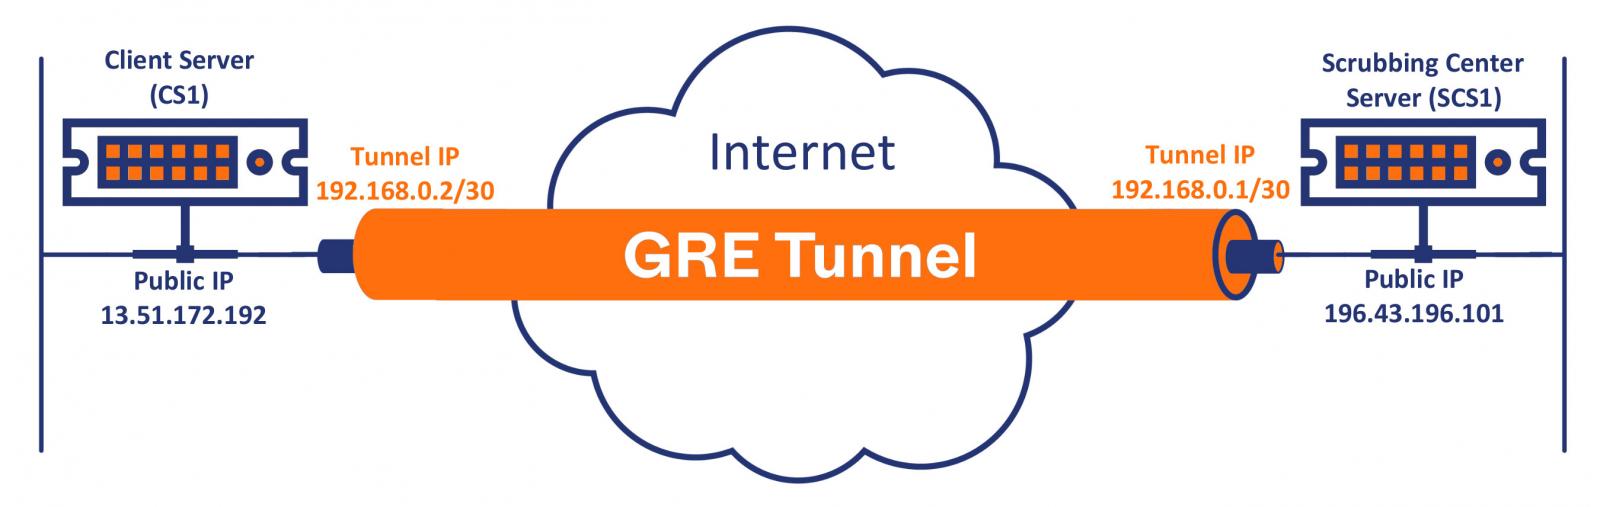
Source: G-Core
Create a new tunnel using the GRE protocol from your server’s public IP address to the remote server’s IP address, in this case 13.51.172.192 and 196.43.196.101, respectively:
bash
# ip tunnel add tunnel0 mode gre local 13.51.172.192 remote 196.43.196.101 ttl 255
If you’re using an Amazon EC2 instance or similar VPC behind an application firewall or network, you need to get the instance’s private IP address because public IP traffic is simply routed to and from the VPC through a private IP address.
As you can see in the output of the following command, the instance’s private IP address is preceded by a hyphen in the full hostname of your VPC:
bash
# hostname -f
ip-172-31-38-152.eu-north-1.compute.internal
Now you can create the tunnel by replacing the local public IP 13.51.172.192 with the private IP 172.31.38.152 you just got as shown below. This is not necessary if you are doing this on a physical server.
bash
# ip tunnel add tunnel0 mode gre local 172.31.38.152 remote 196.43.196.101 ttl 255
Next, you need to add a private subnet to use on the tunnel, which is 192.168.0.2/30 in this example:
bash
# ip addr add 192.168.0.2/30 dev tunnel0
Once done, you can now view the tunnel link using the following command:
bash
# ip link set tunnel0 up
Finally, test if the remote server is reachable through the tunnel by pinging its tunnel IP address as shown in the output below, which means a successful connection through the GRE tunnel:
bash
# ping 192.168.0.1 -c4
PING 192.168.0.1 (192.168.0.1) 56(84) bytes of data.
64 bytes from 192.168.0.1: icmp_seq=1 ttl=64 time=275 ms
64 bytes from 192.168.0.1: icmp_seq=2 ttl=64 time=275 ms
64 bytes from 192.168.0.1: icmp_seq=3 ttl=64 time=275 ms
64 bytes from 192.168.0.1: icmp_seq=4 ttl=64 time=281 ms

--- 192.168.0.1 ping statistics ---
4 packets transmitted, 4 received, 0% packet loss, time 3005ms
rtt min/avg/max/mdev = 274.661/276.239/280.724/ ms
as
At this point, you need to ensure that all traffic coming to you through the tunnel receives the response returned through the tunnel by adding rules to your route table. Use the commands below:
bash
// Create the routing table
# echo '100 GRE' >> /etc/iproute2/rt_tables

// Respect the rules for the private subnet via that table
# ip rule add from 192.168.0.0/30 table GRE

// Set the default route to make sure all traffic goes via the tunnel remote server
# ip route add default via 192.168.0.1 table GRE
That’s it! You have successfully established a connection between your server via a GRE tunnel and a cleaning center.
Conclusion
In this article, you learned what a GRE tunnel is and how it works. We’ve covered how a GRE tunnel can protect your servers from cyberattacks, such as denial of service attacks, by routing incoming network traffic through Gcore’s cleanup center.
We then walked you through how to set up a GRE tunnel connection using your Cisco router or Linux server.
We have prepared this article in collaboration with Google Core — a powerful web and server protection provider with multi-Tbps filtering capability on all continents except Antarctica.
Gcore can protect its data center servers as well as customers’ data center servers using the GRE tunnel. Both methods provide clients with protection against high volume attacks with sub-1ms latency.
Sponsored and written by Google Core
[ad_2]
Source link